Years ago, many homes in the Northeast had front porches built directly over the basement foundation.
The only thing holding back the cold snowy weather and the rain was 1 inch thick tongue and groove pressure treated porch decking that was painted to seal it from the elements and keep the water out.
This is not a good idea. It doesn’t take long for the paint to peel, and seasonal temperature changes will cause expansion and contraction, leaving hairline gaps that break the paint seal on the tongue and groove line.
When bad rain storms hit and the wind blows just right, the covered roof offers little protection and the rain leaks into the basement. During the winter months, blowing snow sits on top of the porch, then on slightly warmer days it melts and leaks into the basement.
The water leaking down saturates the wood between the tongue and groove. The tight space blocks air flow and keeps the wood damp, leading to rot and decay.
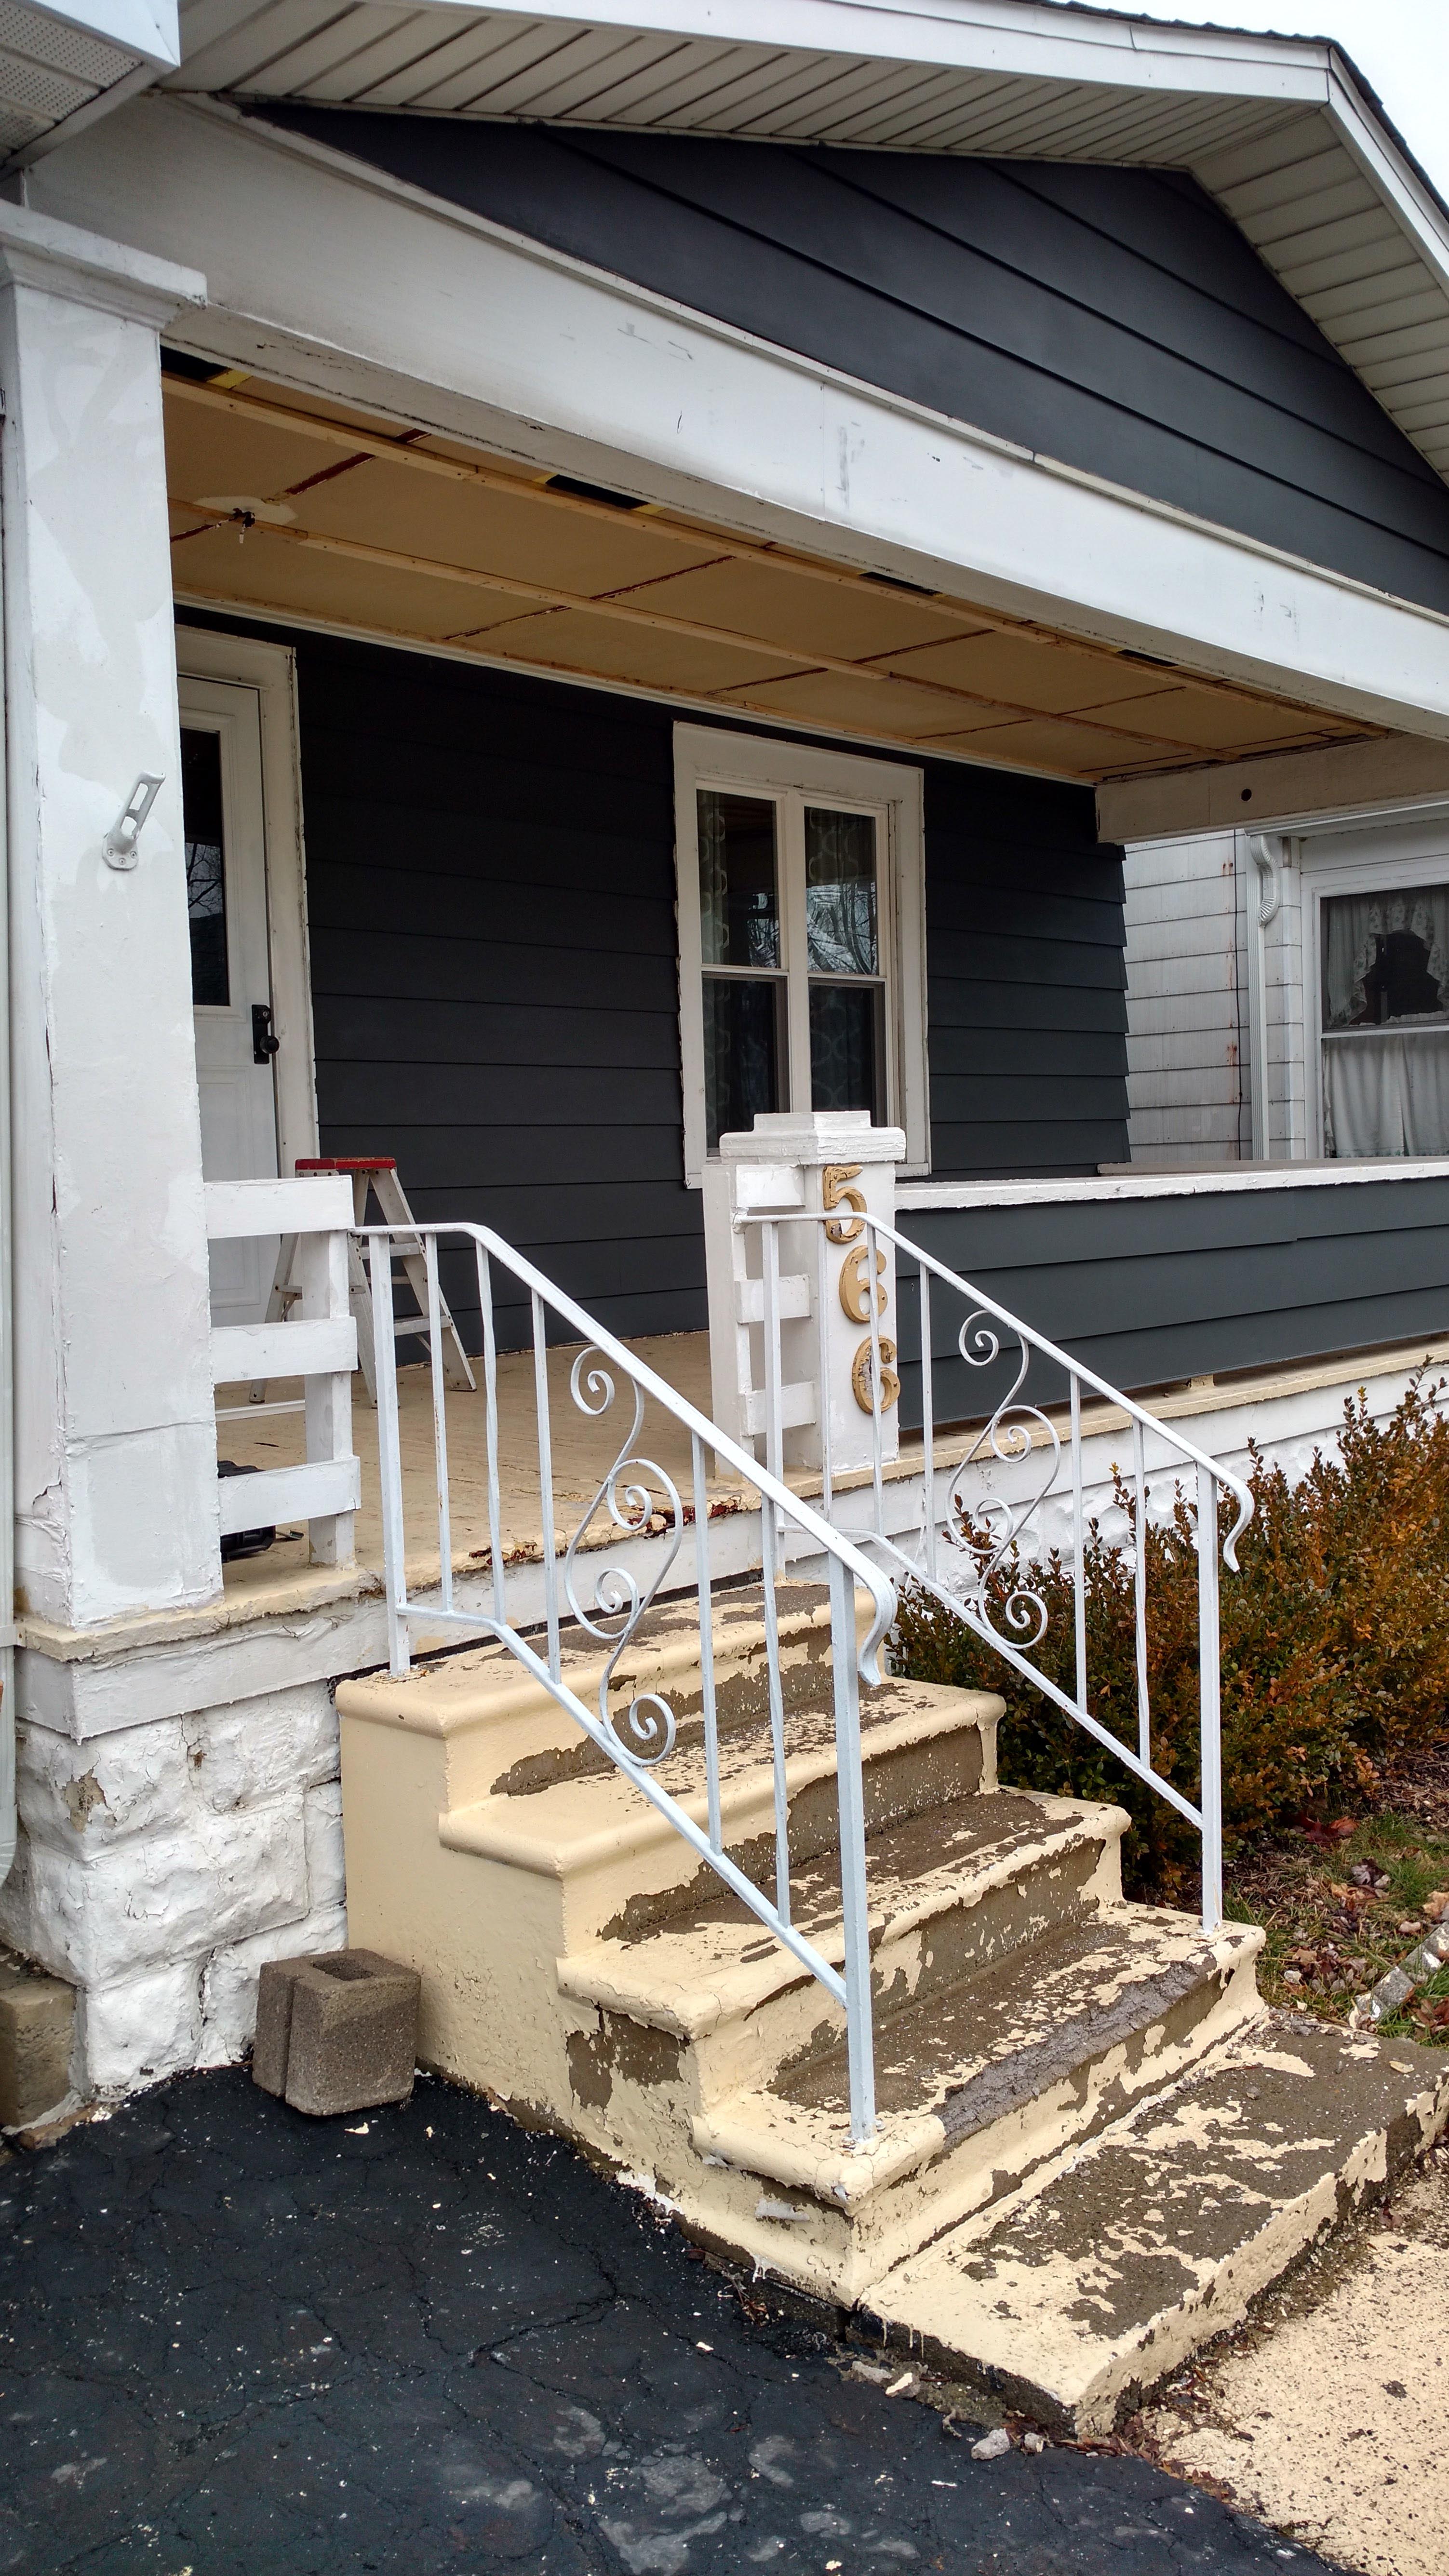
This avid DIY guy and property investor in Buffalo, NY was forced to paint the porch every year and clear off snow throughout the winter. This was a lot of maintenance and just not always possible.
When he bought the property, he knew it would all need to be redone. He started searching for solutions to create a water proof porch surface that would not rot and continuously leak into the basement.
He found the only products really made for this solution were special exterior vinyl sheets that could only be purchased and installed by certified installers.
These sheets didn’t even come wide enough to cover his entire porch, which meant seams would need to be thermo-welded with a special heat gun.
Our customer found the average installation cost for these systems was $4,000 – $5,000, and quite frankly he did not like the look of these products. He said they just looked like the cheap flooring sheet goods you put on the interior of your house.
In addition, he was having a hard time trusting the longevity of these products since they haven’t been around that long. He also worried that the seams would eventually fail or tear as shoes caught on on them.
It reminded him of the composite decking products that have had so many product failures and class action lawsuits. To top it all off, as a DIY guy who takes pride in doing quality work himself, paying someone that kind of money to lay down some sheets and essentially melt them together with a heat gun was like rubbing nails down a chalkboard for this home owner.
Here’s the solution our customer came up with: our Ipe deck tiles. They look much better, allowed him to save a lot of money by doing it himself, and kept everything rot-resistant and waterproof.
First he laid a few tiles the length of the porch to see where they would need to be cut:
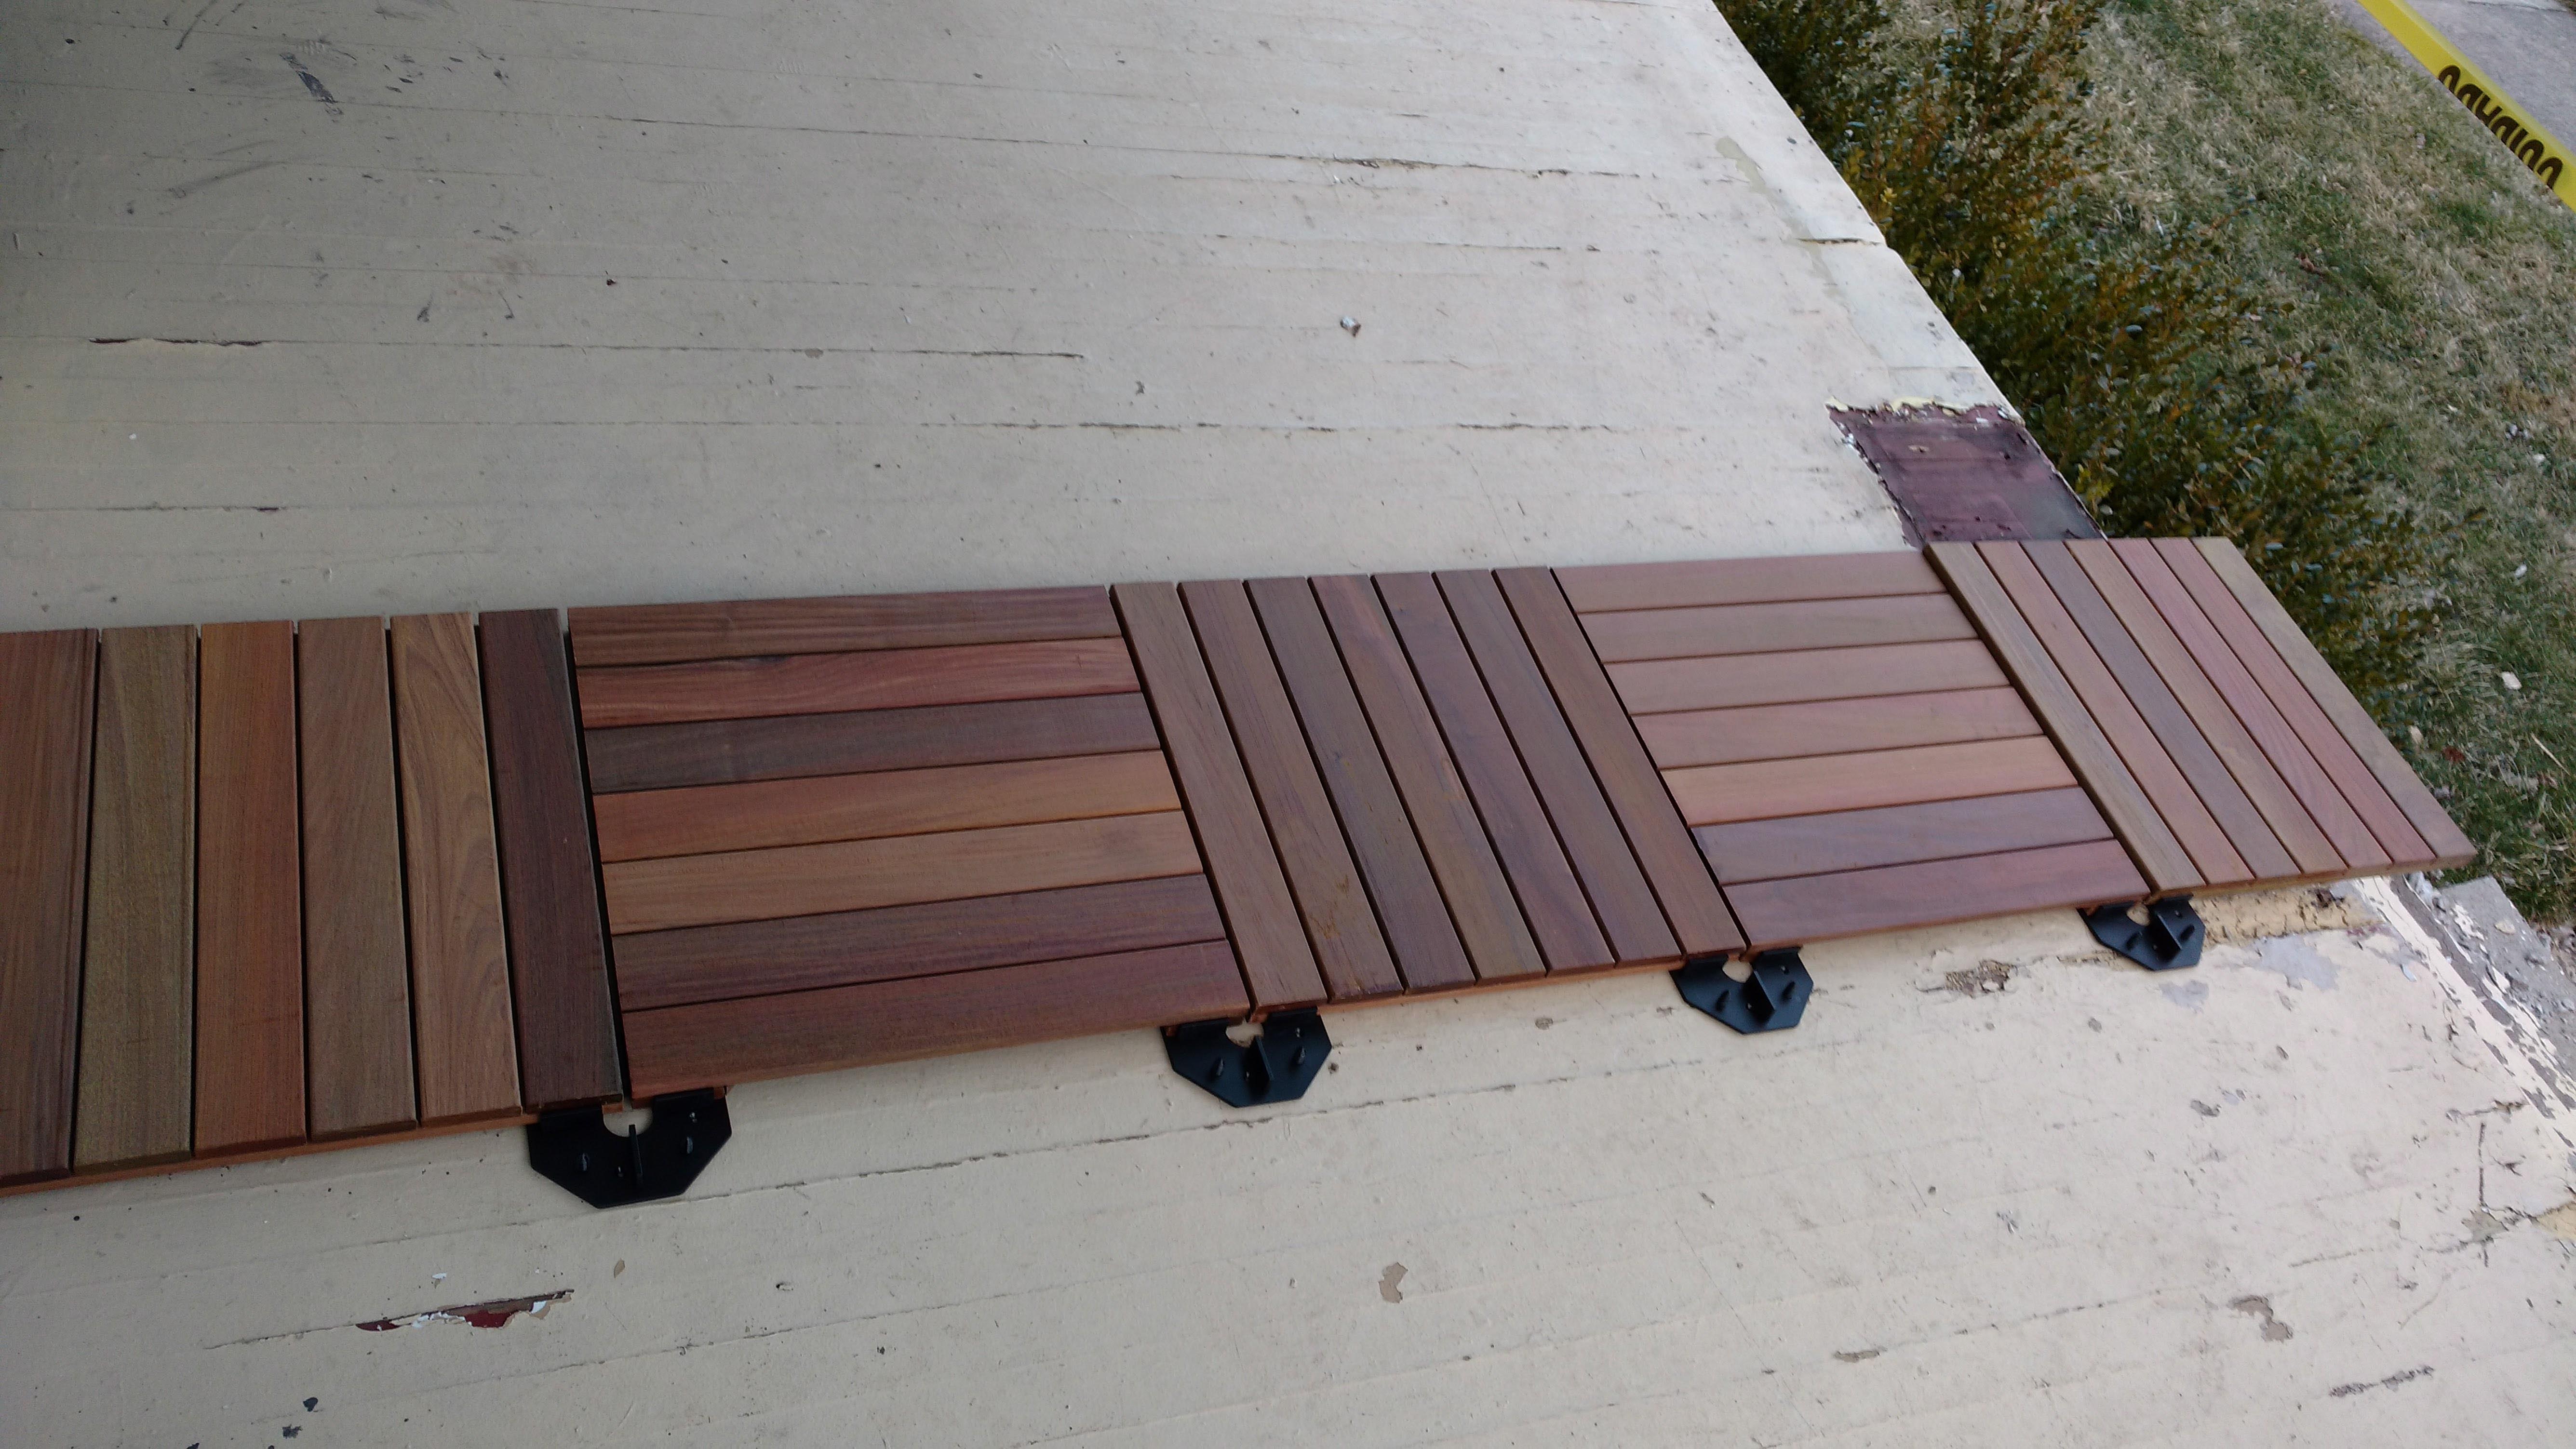
He decided he wanted to have a continuous 6 inch Ipe board screwed into the outer rim joist and framing the entire porch. This way the tiles could float without any penetrations in the ice and water shield.
Once he accounted for the width of the picture framed border, he cut the tiles to fit and decided to put the cut pieces against the house so there would be full tiles on the outermost edge of the porch.
He fixed a few rotted spots in the original porch by cutting them out and replacing them with one inch thick pressure treated wood, matching the existing material.
Next he laid ice and water shield over the entire porch according to the manufacturer’s requirements, overlapping the ice and water shield appropriately and keeping everything water positive – starting at the outside edge of the porch and overlapping the seams as you work your way toward the house.
Once the entire porch was waterproofed, it was a suitable foundation to float the deck tiles on top of the porch.
One important and obvious note to consider: make sure your front door will clear the tiles when floating on top with the deck tile connectors. In this case our customer had enough room, but he was planning on replacing the old outward-swinging door with an inward-swinging one, so it wouldn’t matter anyway.

We custom milled a 2 x 6 board to match the thickness of our 20 x 20 Ipe deck tiles. This board served as the picture frame for the deck tiles.
He also replaced the old crumbling concrete steps with Ipe decking, white vinyl risers, and vinyl railing.

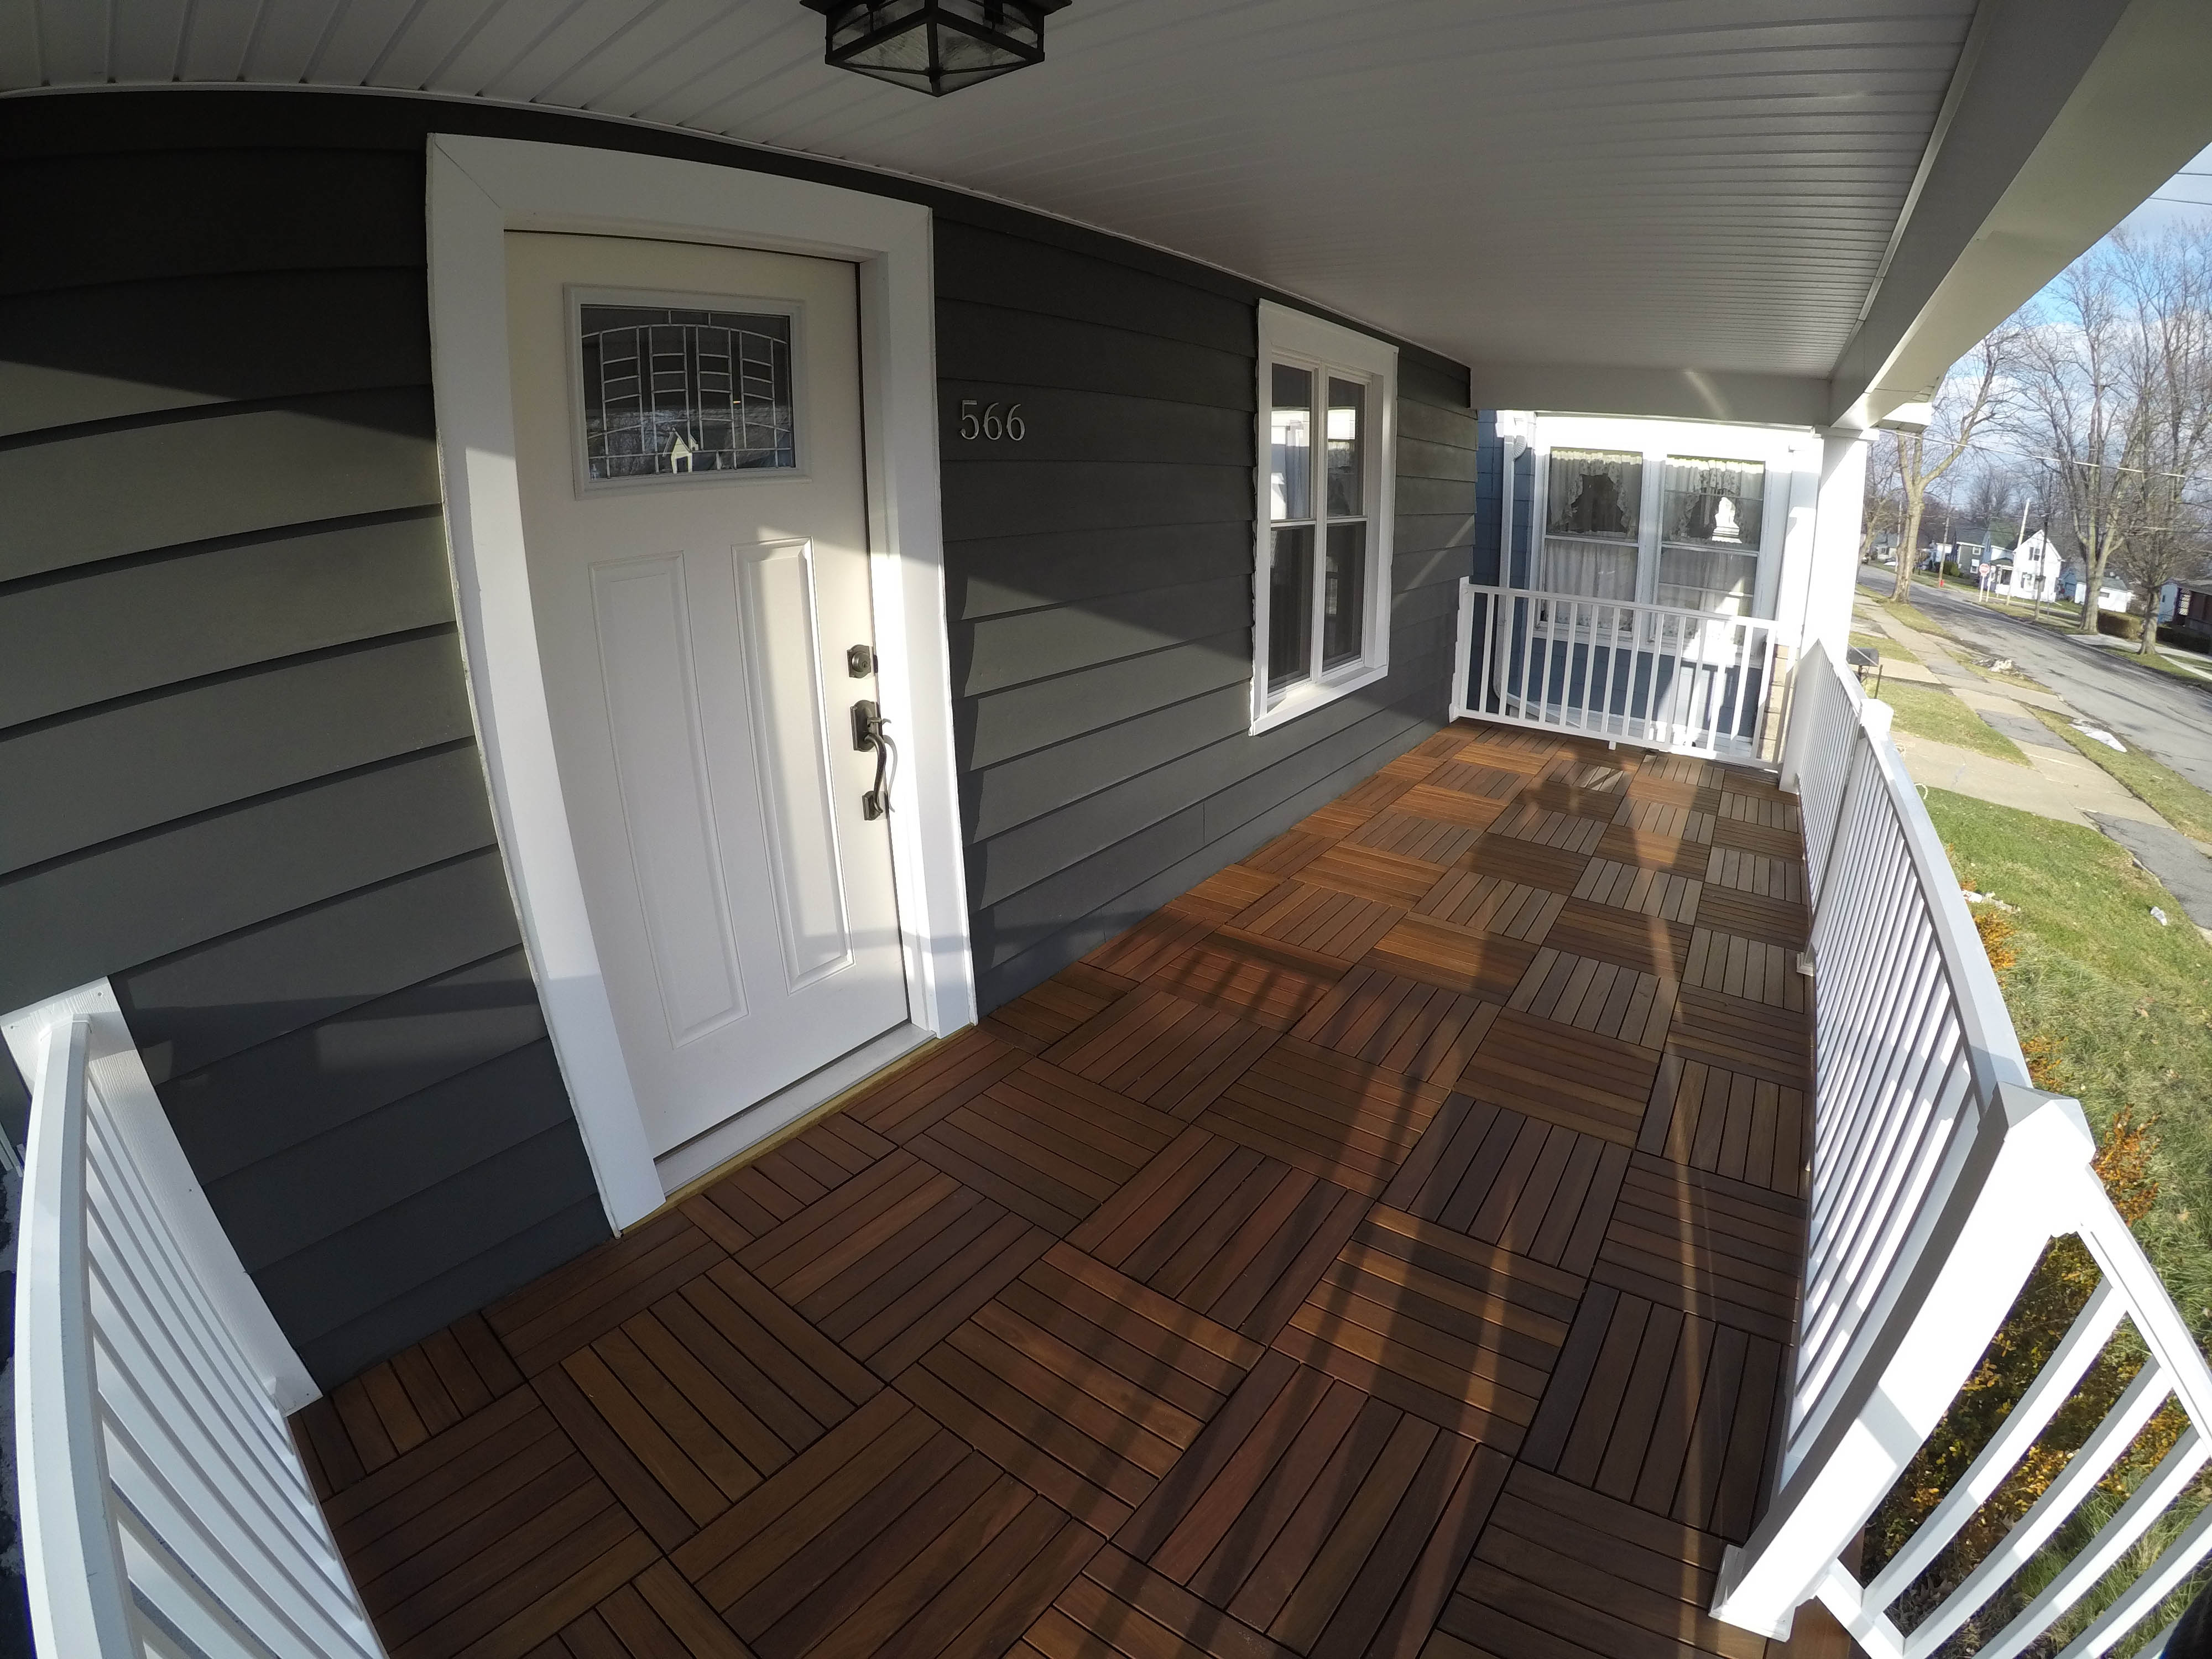
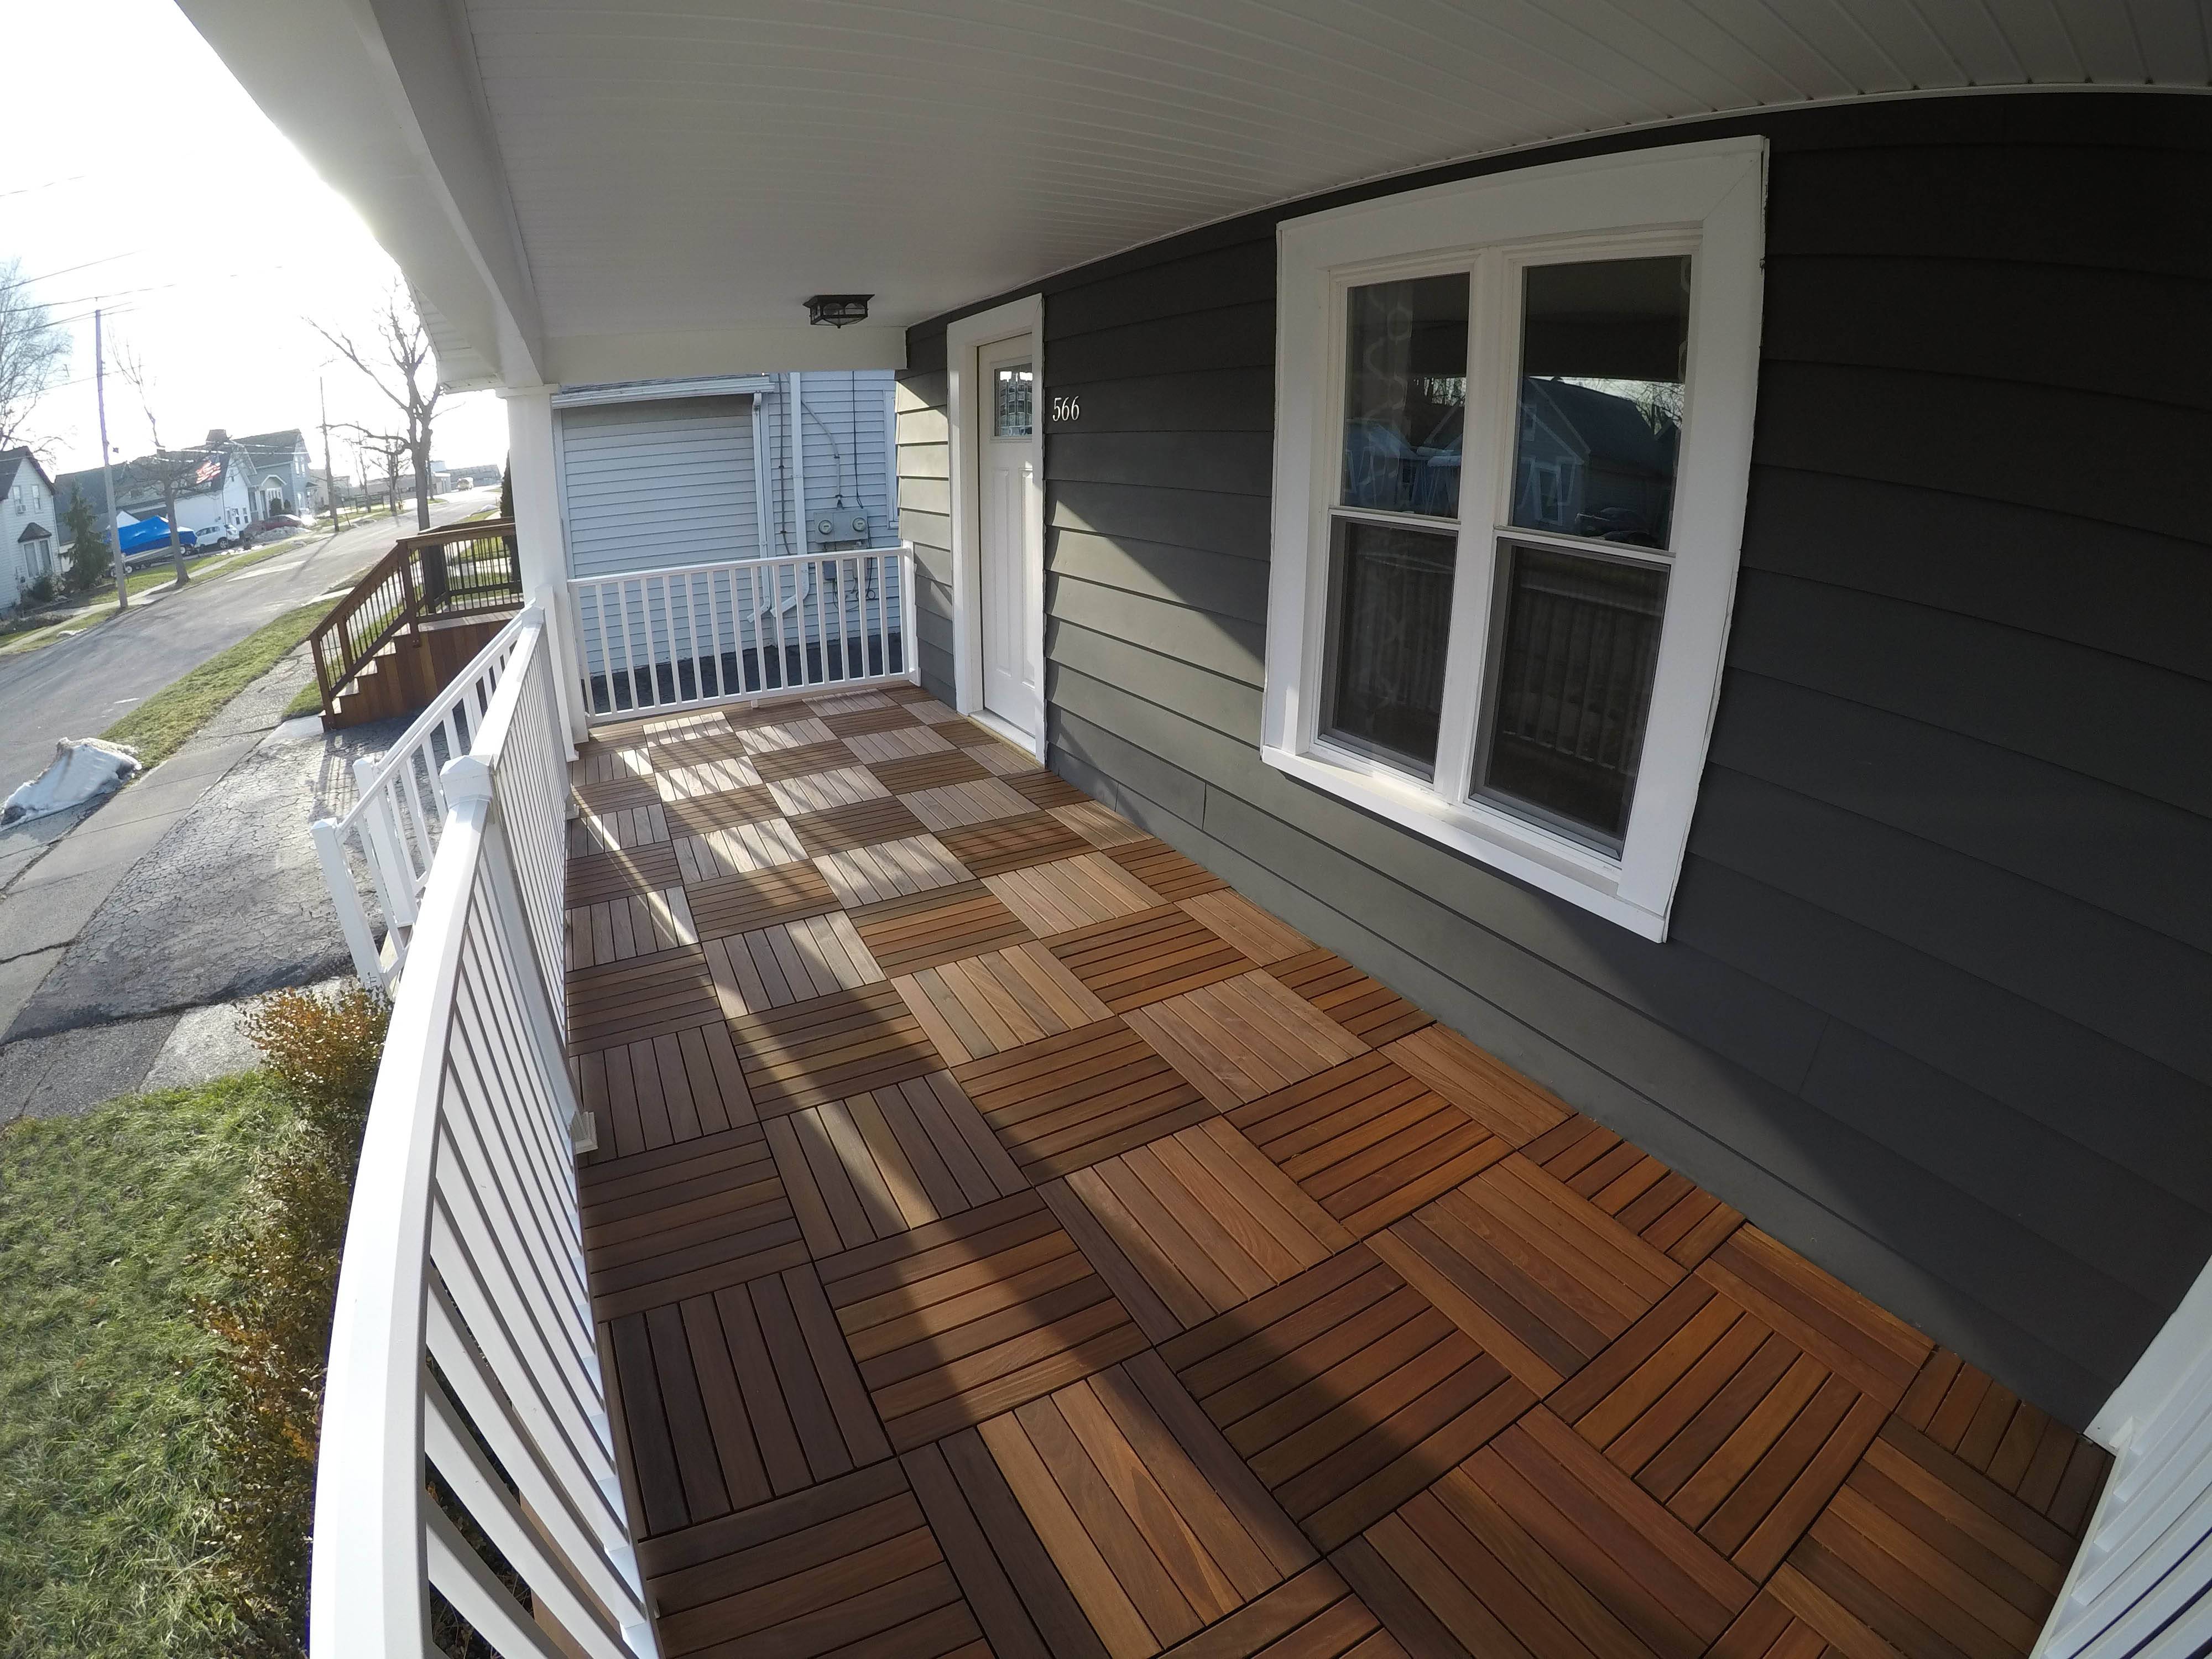
Our customer is thrilled with the results, and the deck tiles are exceeding his expectations. He said the installation was a breeze since they just snap together with the DeckWise tile connectors.
The picture above is at the end of the first winter in Buffalo (you can see the snow pile in the back at the curb). The deck tiles still look amazing and he still can’t believe how much money he saved opposed to those ugly vinyl sheet products.
He needed 65 of our 20 x 20 Ipe deck tiles, which cost him just over $1,000. He purchased the railings from a local building supply store for around $700, and he got the Ipe deck boards, DeckWise tile connectors, and vinyl products for his risers and skirting. In the end, he completed the project for around $2,000.
Everyone in the neighborhood has complimented the new look – even the pizza delivery guy!
You can purchase deck tiles directly from us and we’ll ship them to your house or job site. No job is too big or too small.
I have an uncovered concrete porch over a basement area. While I’ve painted it several times, I’m still getting some seepage of water into the basement. Would your deck tiles be a good solution. Since they are not over a wood porch, would one glue them down?
The deck tiles alone would not prevent your concrete porch from leaking so you would need to put down a waterproofing membrane first and then float the deck tiles over the top of that.
I have a tiled porch which I thought would stop leaking and seepage of water into the basement, however, I continue to have seepage, especially where the porch meets the house. Is there any fix at this point. The porch has ceramic tiles.
Ceramic tile itself would not make you porch water proof if anything it could help water collect and depending on how pitched your porch is the water could drain where the porch meets the house like you are experiencing. This will eventually lead to rot also depending on how the tile was installed they could be trapping moisture in between the tile and your wood porch which will lead to faster rot and decay. You need to remove the first row of siding and probably all the ceramic tiles and start with a waterproofing membrane like ice and water shield like done on this house. You must start applying the water shield on the outer edge of the porch first and work your way back to the house overlapping the ice and water shield as recommended by the manufacturer to keep everything water positive. Once you get up to the house where you’ve removed the first row of siding you would run the water shield up the house a few inches then put your siding back on and float these deck tiles over the top of the porch.
What is the water shield that you put on before you put the tiles in? Is it something you paint on and if so what is it and where do I get if from?
It’s simply just ice and water shield that you would put on a roof it’s available at any Home Depot or Lowe’s in the roofing section. It’s very sticky and is made for waterproofing and preventing leaks on your roof from ice dams. It’s very easy to apply and fixed this homeowners old leaking tongue and groove porch. The tiles were then just floated on top with DeckWise tile connectors.
The outer edge on my porch is brick. Can the 6″ lpe boards be screwed into brick?
Provided the brick is in good shape you should be able to use tapcon screws to fasten the Ipe to the brick. It is important to note though we do recommend airflow underneath so water and moisture is not trapped underneath the board. If the wood was constantly wet underneath while dry on top it would create two different environments and you could experience a slight cupping of the board. You could use a 4 inch wide board as a narrower board is less likely to cup or move. Another option too would be to not have a picture framed border and just use the deck tiles. You could then just rip down an Ipe board and fasten it to the edge of the tiles as a trim piece to finish the edges so you don’t see the edges of the tiles. We do also sell edge pieces for the tiles.
We have same situation- however we already have the waterproof membrane down and had wood flooring put over top that we found after installing the lumber company we purchase the wood from didn’t actually kiln dry the boards like we were told.. so we have rotten wood now. Anyway my question/ concern is Do we remove all the wood down to the waterproof membrane and install new ipe tiles directly to the waterproof membrane?
Yes as long as your waterproofing membrane is still good you can float the tiles right over the top, just connect them all together using the DeckWise tile connectors. You can fasten the outer last sections, this home owner used a picture framed border and fastened that to the outer rim joist of the porch so it would not cause any leaking, a dab of silicone was used where the screws were driven for added protection.
Ok – great! So just to reiterate- So provided the waterproof membrane Is in great shape- we should not need anything placed between the waterproof membrane and the new ipe decking tiles ..?
What is the depth of the tiles?
Thank you!
You can see the specs on the deck tiles here: https://www.advantagelumber.com/deck-tiles/ they are 1.18″ inches high you also need to account for the deck tile connectors which will add an additional .16 of an inch. Nothing should need to be placed on top of the membrane if its in good shape just the deck tile connectors and the deck tiles should work fine.
I have a duplex up and down with two porches and two columns on each porch and the front door has no roof over it and a basement below. I have problem every year with rout and leaks in basement. Do you think this would work for my porches. If you say yes would you know who can help me install this great product. Thank you Phyllis
As long as you fix any rot and make sure the supporting framing underneath has not rotted as well and then apply the waterproofing to the entire porch and even behind the first course of siding where the porch meets the house. Then you float the deck tiles over the porch and you can secure them on the outer edges then it should work fine. We do not have anyone that we can recommend as there is no way for us to verify the quality of the work. We suggest finding some reputable contractors in your area and showing them this blog post to see if they can complete the work for you.
We have aggregate floring on our outside deck which continues into a screened porch. Below are rooms in which water leaks apparently from above (the aggregate floor). Also, the deck is oval on the outside radius.
Would your product be a solution to our problwm?
The deck tiles by themselves would not fix your problem. The homeowner in this situation applied an ice and water shield membrane over the old existing porch to waterproof it and then floated our deck tiles over the top to create a nice low maintenance porch surface that would not pierce the new waterproofing membrane. Your situation sounds different though and it’s hard for us to understand your complete problem. We would advise having some professionals come look at your problem because if it’s been leaking for awhile you could have structural rot and damage so applying something like this over the top without assessing all the damage could be very dangerous. The homeowner in this blog post was able to easily see all the structural framing in his basement and made sure to fix any rot first.
I’d like to have a more traditional look to our porch floor using plastic deck boards that look like lumber. Would that work?
Yes you can do that we’d recommend TimberTech® PVC Decking by AZEK