At AdvantageLumber.com, we’re big fans of Trex composite decking. It delivers the beauty of real wood with far less maintenance, incredible durability, and a warranty that can last up to 50 years on select lines. One of the best ways to showcase Trex’s clean, modern look is with hidden fasteners no visible screw heads to interrupt the smooth surface or collect dirt.
Important Warranty Note
Trex decks are built to last, but proper installation is key to keeping your warranty intact. Failing to use manufacturer recommended hidden fasteners will void your Trex decking warranty. Always stick with Trex Hideaway® Universal Hidden Fasteners (or other Trex approved systems listed in their current installation guide) to protect your investment.
Ready to get started? Here’s a clear, step by step guide based on Trex’s official recommendations. Always download the latest Trex Decking Installation Guide from Trex.com before you begin, and check local building codes.
Tools & Materials You’ll Need
Materials:
- Trex decking boards (grooved edges preferred for hidden fasteners; square edge boards require routing with a Trex router bit)
- Trex Hideaway® Universal Hidden Fasteners (self gapping clips with pre-set stainless steel screws)
- Trex starter clips (for the first board)
- Trex Hideaway® butt joint clips (for end to end board seams)
- Trex color matched composite deck screws or plugs (for the first and last boards if needed)
- Pressure treated blocking where required
Tools:
- Cordless drill/driver with T10 or T15 Star bit (included with fasteners)
- Trex Hideaway One Step Installation Tool (highly recommended for speed and accuracy)
- Circular saw, miter saw, jigsaw
- Speed square, chalk line, string line
- Rubber mallet, bar clamps, pry bar
- Safety gear (eye/ear protection, gloves, etc.)
Step by Step Installation
- Prepare Your Framing
Ensure your joists are level, properly spaced (typically 16″ on center maximum for most Trex boards), and pressure treated or approved for composite decking. Install sister blocking or extra joists where boards will butt end to end. Leave the proper overhang at the rim joist (usually ¾”–1″ depending on your fascia plan). - Install the First Board
Start with a straight, square edge board along the outer rim. Use Trex starter clips fastened to the rim joist at every joist location. Slide the grooved edge of the first board into the starter clips. Secure the outer edge with color matched composite screws (pre-drill if necessary) placed 1″ from the ends and no more than 16″ on center. Keep the board perfectly straight—this sets the tone for the entire deck. - Install Hidden Fasteners on the First Board
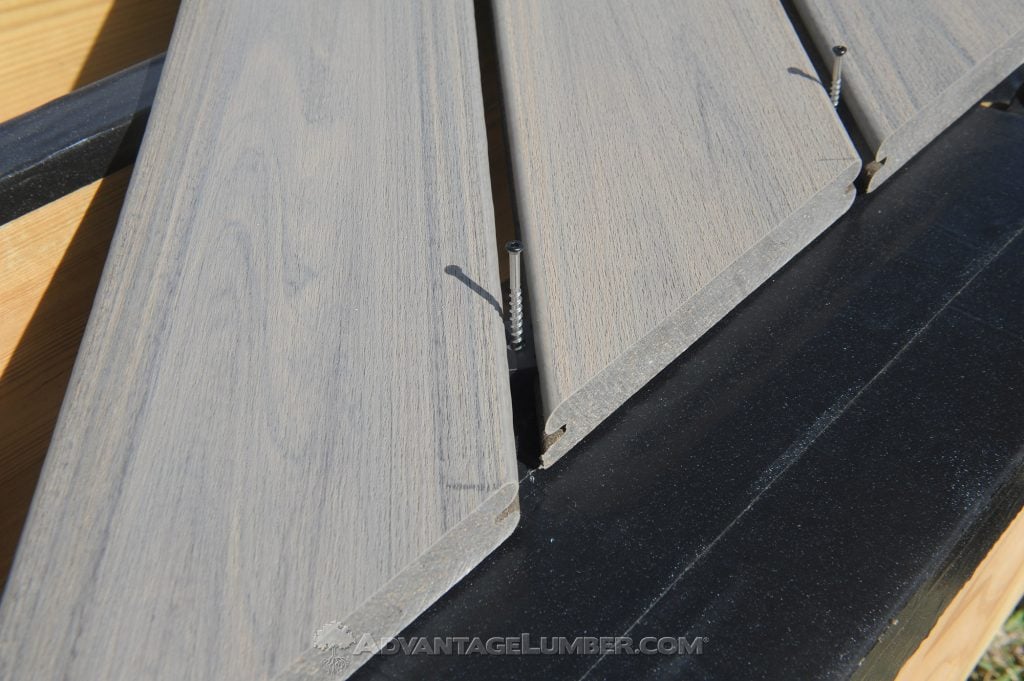
Place one Trex Hideaway Universal Hidden Fastener in the exposed groove of the first board at every joist. The built in spacer tabs automatically create the manufacturer recommended gap (typically around 1/4″). Center the fastener on the joist and drive the screw until it’s flush or slightly countersunk do not overdrive. Use the optional One Step tool for faster, more consistent results. - Slide and Seat the Next Board
Slide the next grooved board into the fasteners. Tap it gently with a rubber mallet to fully seat it against the spacer tabs. Stand on the board or use clamps to hold it firmly while you move to the next row of fasteners. - Repeat Across the Deck
Continue installing fasteners on the exposed groove of the newly laid board, then sliding the next board into place. Pull a string line every few rows to check for straightness and make minor adjustments if needed. Work from the outside edge toward the house for easiest access. - Handle Butt Joints Properly
Where two boards meet end to end, install blocking between joists and use Trex Hideaway butt joint clips (one on each side of the joint) or place two standard fasteners side-by-side over the joist and blocking. This prevents movement and keeps the seam tight. - Install the Final Board(s)
The last board (usually against the house) may require face fastening with color-matched screws or plugs. Pre-drill and fasten 1″ from the edge at every joist. For a completely hidden look on solid core lines, use the Trex Hideaway Deck Plug system where appropriate. - Cut and Finish Edges
Once all boards are installed, trim the perimeter overhangs straight with a circular saw. Install fascia, railing, and any trim for a polished look.
Pro Tips for a Professional Result
- Temperature Matters: Gapping requirements change with ambient temperature check the latest Trex guide before cutting boards to length.
- Don’t Over tighten: Snug is perfect; over driving can damage the board or clip and affect your warranty.
- Stay Straight: Use clamps, a string line, and a rubber mallet to keep everything aligned.
- Work Smart: The Trex One Step tool and a good impact driver make the job dramatically faster.
- Safety First: Composite decking can be slippery when wet wear proper footwear.
Why Hidden Fasteners Are Worth It

Hidden fasteners give your Trex deck that seamless, high end appearance while allowing the boards to expand and contract naturally with the weather. When paired with Trex’s premium composite material, you get a deck that stays beautiful for decades with minimal upkeep.
At AdvantageLumber.com, we carry the full line of Trex decking: Signature®, Transcend®, Enhance®, Select®, and more along with the exact Trex Hideaway hidden fasteners, starter clips, plugs, and tools you need for a warranty safe installation. Our team is here to help you choose the right products and answer any questions.
Ready to build the deck of your dreams? Browse our Trex collection today at AdvantageLumber.com and let us help you bring your outdoor vision to life. Questions? Call our decking experts we’re happy to help!
Always refer to the most current Trex Installation Guide and consult a licensed professional if you’re unsure about any part of your project.