Building a deck is something you’ve always wanted to do, but you’re a little uneasy about how it can effect insurance or property taxes. Some companies consider an attached deck as an addition to the total square footage of your home and can increase rates or taxes. Don’t feel as if all is lost, there is an alternative. Free standing decks are self supporting deck structures that are not attached to your house, but will still give you the outdoor escape you desire.
As always, before you begin any decking project check with local building codes and regulations. There could be different variables that you can encounter while building a free standing deck. Follow all manufactures installation instructions for the individual products. And as always, make sure you contact a licensed contractor that is familiar with free standing deck structures prior to installation.
Temporary or Permanent?
A free standing deck can be built in either manner. If you opt for a permanent deck, you will need to install a secure foundation base such as concrete. With a temporary deck a concrete foundation is not necessary. Having a temporary deck allows you to move the deck, or if you are in a temporary residence, you can break down the deck and move it to your new location.
A temporary free standing deck might seem like the best solution because you have a landlord, but it’s extremely important to contact your landlord before installation for approval. It’s even better if you can get the agreement in writing.
The Installation
After you have obtained the permits and have determined how you want the free standing deck to look like, outline the perimeter. The best way to do this is to string lines tightly between stakes. Use a line level to ensure that all of the stakes are the same height.
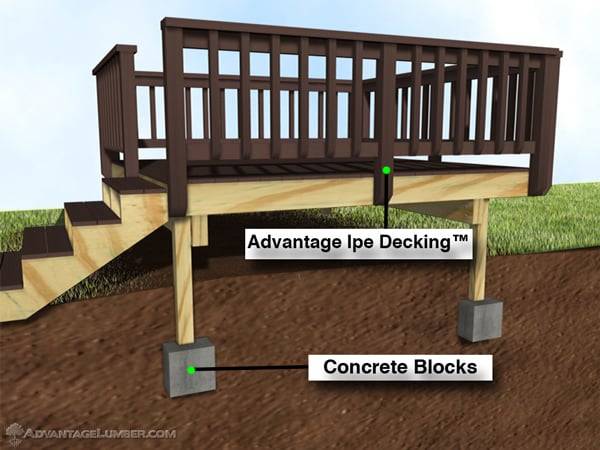
The footings are the most important element of your free standing deck. Pier blocks are the best solution because they provide even weight distribution for your deck. Be sure to check on local building codes for pier block installation. The pier blocks must be set on undisturbed soil. This might mean you’ll have to do some digging. As always, make sure there is a support every four feet. Place the pier blocks into the ground. If you are using precast pier blocks, pour the concrete into the blocks, and allow adequate time for drying of the concrete. This can take up to five days.
Next, you’re ready for the framing using 2” x 6” pressure treated lumber. Use ribbon joists that are bolted to the posts at the height that you desire for your deck. These joists will be supported by cross beams. Use stainless steel bolts to secure the framing to the posts. DO NOT RELY ON SCREWS OR NAILS TO HOLD YOUR DECK TOGETHER!
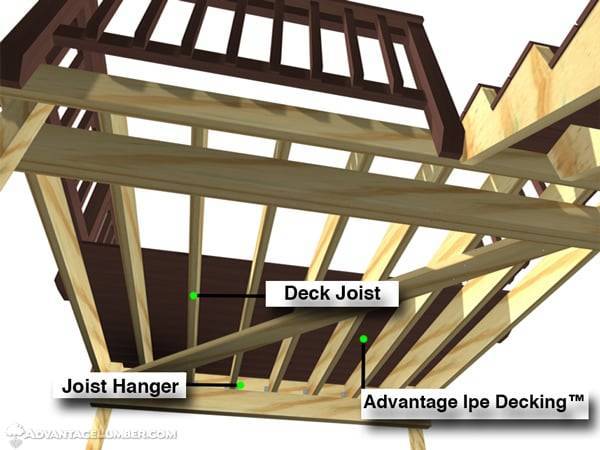
Now you’re ready to install joists to the frame. It is important to use joist hangers to attach the joists to the frames. Refer back to our deck joist waterproofing post to learn how to protect joists from water intrusion.
Install your Advantage Decking™. Lay the planks perpendicular to the joist, and make sure to leave space between each board for expansion and contraction of the wood. Secure the deck boards to the joists with Ipe Clip® Hidden Deck Fasteners. These are excellent fasteners to use because only one screw and fastener are needed per joist. They are safer to use, eliminating the chance for any nails to pop up.
Our Advantage Lumber Decking™ requires no chemical treatment or staining, but will shine beautifully when treated with Ipe Oil®. If staining isn’t what you desire, over time the decking will fade to an attractive silver gray.
If your options are slim when it comes to decks, building a free standing deck is not out of reach. With the right materials, knowledge, and a little elbow grease, you can create a stunning outdoor escape.
If this all seems a little overwhelming, it’s important to contact a licensed contractor for all the labor. It’s better to hire a professional and know that the job gets done properly instead of trying to take on more than you can handle.
I was thinking about having a deck installed in our front yard. The addition of it should provide our home with a much-needed boost in the aesthetics. As you’ve mentioned, checking the building codes and regulations would be important for us as we are going to start a decking project. That advice is definitely timely and helpful as it would let us avoid any potential issues with the law. Thanks!
In our front yard, I was considering building a deck. It should give our house the much-needed visual upgrade that it needs. As you indicated, we should examine the applicable building laws and regulations before we begin our decking job. That counsel would assist us avoid any future legal problems, thus it is both timely and beneficial. Thanks!