TimberTech AZEK® Porch should be installed using the same good building principals used to install wood or composite porch and in accordance with the local building codes and the installation guidelines included below. AZEK® Building Products Inc. accepts no liability or responsibility for the improper installation of this product.
TimberTech AZEK Porch may not be suitable for every application, such as not being suitable for waterproof applications, and it is the sole responsibility of the installer to be sure that TimberTech AZEK Porch is fit for the intended use.
Since all installations are unique, it is also the installer’s responsibility to determine specific requirements for each TimberTech AZEK Porch application. AZEK Building Products recommends that all applications be reviewed by a licensed architect, engineer or local building official before installation.
Tools Required
• TimberTech AZEK Porch can be installed using the same tools you would use to install wood porch products.
• Corded or cordless driver/screw gun may be used.
• Self-feeding screw guns can be used. Check with manufacturer for compatibility with TimberTech AZEK Porch.
• Miter saw with a fine-toothed, carbide tipped finish trim blade works well for cutting.
• As with installing a wood porch, safety glasses should be worn during the entire installation process.
• For best results, a power miter/compound miter saw with a fine-toothed carbide tip alternate top bevel blade is recommended (12” – 60 tooth minimum).
Use a jigsaw to cut around obstructions such as posts. When working with TimberTech AZEK products be sure to wear proper clothing and safety equipment. Safety glasses should be used during the entire installation process. Do not use any cordless saws as chipping will occur.
STOP! Read this section before you start!
TimberTech AZEK Porch
TimberTech AZEK does not recommend the use of rubber or vinyl products (welcome mats, planters, etc.) on porch boards. A reaction can occur that causes discoloration of the board under the rubber/vinyl product. This is a common caution for vinyl decking products.
Do NOT nail TimberTech AZEK Porch boards.
Color and Temperature: Although TimberTech AZEK Porch is cooler to the touch than many other porch boards in similar colors, all porch products will get hot in the sun. Additionally, the darker the porch color, the hotter it will feel.
Cutting or drilling metal should not be done on TimberTech AZEK Porch boards as metal shavings may be come hot and embed themselves into the boards. Always be sure to check and cut the factory cut ends of boards to ensure they are square.
Walking Surface and Grain Pattern: TimberTech AZEK Porch planks are intended to be installed with the embossed wood grain side up. The non-embossed surface is not to be used as a walking surface. This applies to all porch surfaces.
Static Electricity: The buildup or generation of static electricity is a naturally occurring phenomenon in many plastic based products such as carpeting, upholstery, and clothing, and can occur on alternative decking under certain environmental conditions.
Cantilevering: For best results, don’t cantilever over 1/2″.
Routing: TimberTech AZEK Porch/Rim Joist Covers/Riser should not be routed.
Color and Grain Patterns: TimberTech AZEK Porch is designed to mimic the look of real wood, and like real wood, there will be a slight difference in color and grain pattern from board to board.
This is intentional and part of the manufacturing process, giving TimberTech AZEK Porch the most realistic and wood-like appearance possible. This variation is purely aesthetic and does not or will not affect the performance of the product.
Rooftops: DO NOT attach porch boards to a floating sub-structure which is not mechanically fastened frequently and sufficiently to the building and roof deck.
Note:
In areas with obstructed airflow such as roofs and on- grade applications, a minimum of 1 – 1/2” sleeper system supported by and connected to the substructure over which the deck is built is required.
TimberTech AZEK Porch is NOT intended for use as columns, support posts, beams, joist stringers, guard railing or other primary load-bearing members. TimberTech AZEK must be supported by a code-compliant substructure.
While TimberTech AZEK Porch products are great for re-planking (removing old porch surface boards and installing TimberTech AZEK on a code-compliant substructure), AZEK Porch boards CANNOT be installed on top of an existing porch.
TimberTech AZEK Porch is not intended to be waterproof and should not be used in any waterproof application. Caulks, adhesives or other similar products should not be used in the tongue and groove areas of TimberTech AZEK Porch.
Failure to install TimberTech AZEK Porch products in accordance with applicable building codes and this Installation Guide may lead to personal injury, affect porch/deck system performance and void the product warranty.
Installation Preparation
Follow these guidelines for best porch installation:• Avoid storing TimberTech AZEK Porch in areas of excessive heat:
Joists should be sloped at 1/4″ per foot away from the house to facilitate drainage.
TimberTech AZEK Porch Boards are one-sided products. Porch Boards are to be installed with the grain side up for the walking surface.
- TimberTech AZEK Rim Joist Covers are one-sided products. Rim Joist Covers are to be installed with the grain side out.
- Proper joist spacing is required for proper installation. Joist spacing should never exceed 16” on center. For a more rigid feel, 12” may be preferred.
- Prior to installation of TimberTech AZEK Porch boards, make sure joists are structurally sound, free of nails and spaced at a maximum of 16” center to center.
- If installing porch plank at 45 ̊ angle, space joists at 12″ on center.
- TimberTech AZEK Porch has a maximum span of 16″ on center.
- As joists are installed, run string line frequently to ensure that the tops of the joists are in plane, as TimberTech AZEK Porch will conform to the contour of the joists to which it is attached. It may be necessary to shim or plane joists due to size variations in lumber. Be sure to sort and exclude any extremely crowned joists/lumber material.
- Install solid wood blocking between each joist, placed in rows at maximum every 4’ – 6’ within the structure using exterior grade screws. Solid blocking will help reduce up or down movement and/or twisting of joists. Limiting joist movement can help reduce excessive gaping and also ensure a more uniform finished surface of the TimberTech AZEK Porch.
- Be sure to install sufficient wood blocking below areas where railing posts will be installed.
- Provide proper structural support below TimberTech AZEK Porch where load bearing columns are present.
- Items related to stair construction, structural framing or any other general construction questions should be reviewed with the local code authority, engineer, or architect.
- All porch framing and substructure should be securely attached to ground footings and/or building structure. No floating substructures should be used.
Fasteners
Listed are several suggested fastening methods. Additional fastening methods may exist for
TimberTech AZEK Porch.
- Minimum #7 x 2″ 305 stainless steel trim head screw with #17 drill point.
- When using a pneumatic flooring nailer, we suggest using barbed/serrated 2″ stainless steel cleat “T” nails or “L” cleats.
- For salt water coastal applications, we suggest using the above minimum fastener requirements in 316 stainless steel fasteners.
- Please contact fastener manufacturer to ensure availability, compatibility, and proper use with TimberTech AZEK Porch.
Expansion and Contraction
When fastened properly, TimberTech AZEK Porch will demonstrate minimal changes due to expansion and contraction. The expansion and contraction encountered may result in slight gaps which might be noticed at the ends of boards or in splice joints. Best practice is to cut and fasten TimberTech AZEK Porch boards as soon after cutting as possible.
- When long runs of porch boards with butt joints is planned, it is best to keep boards shaded or as cool as possible prior to installing, then fasten boards together tight at splices or miters.
- Be sure to fasten ends of boards, splices, or abutments to building or structure securely into framing using a screw which is positioned within 1/2″ of each board end or joint.
- For butt joints, be sure to trim cut factory ends to ensure squareness. Do not scarf cut butt joints.
- Expansion and contraction are most significant where extreme temperature change may exist.
- For best results, stagger splices and miters across the porch surface so that all splices and miters do not break on the same joist.
- During installation, frequently check that TimberTech AZEK Porch boards are installed straight by checking frequently using a string line.
- To further minimize expansion and contraction, proper ventilation and air flow should be considered.
- Framing/sub-structure must be securely attached to ground footings or building structure. No floating sub-structures should be used in any application with TimberTech AZEK Porch, including on grade, concrete, or in roof top applications.
Install the Starting Board
- TimberTech AZEK Porch is one-sided with the grain side up for the walking surface.
- Install starting board with grooved edge against the house or on the outside edge of the porch if the boards will run perpendicular to the house.
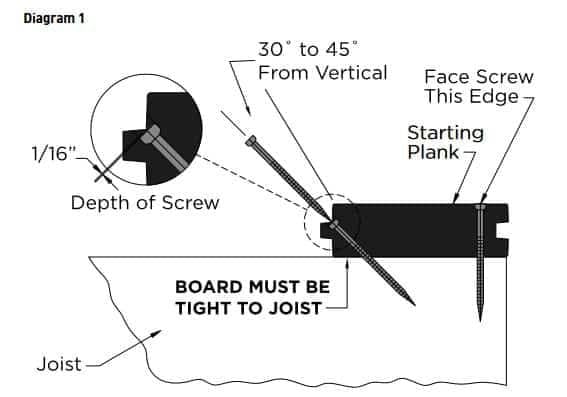
- Attach the starting board by first installing fasteners down through the board at the edge nearest the groove.
- Then attach at each joist by driving a fastener through the tongue at the approximate angle shown in Diagram 1.
- Fasteners should seat approximately 1/16″ into the surface of the product above
the tongue as shown to allow for complete insertion of the next board.
Installing the Next Board
- Install the next board by inserting the grooved edge over the exposed tongue on the starting board. It may be necessary to apply light pressure to ensure the board is engaged completely to minimize irregularity in top seam. Do not strike the board with a hammer or mallet, or damage to the board may occur.
- After board is fully engaged onto the starting board, drive fasteners through the tongue at each joist as shown in Diagram 2. Remember to countersink the fasteners slightly to provide necessary clearance when installing the next board.

Installing the Remaining Boards
- Continue to add boards per step 2 until outer edge of porch is reached.
- Final board may require removal of tongue or rip cutting to a necessary width. Use a table saw or circular saw to accomplish this. Attach the last board by face fastening through the top or toe fasten along the outer edge.
Perimeter Details Finishing Options
- Cover exposed edge with AZEK Trim or TimberTech AZEK Deck rim joist cover. Refer to AZEK Trim or TimberTech AZEK Deck Installation Guidelines for proper installation of trim or rim joist cover.
- Picture frame the entire porch using TimberTech AZEK Deck 1″ x 5 1/2″ as a border. If this option is desired, layout porch accordingly to accommodate variance in spacing and height. Square shouldered TimberTech AZEK Deck planks are available in all porch colors, with the exception of Oyster.
- Attach AZEK Moulding to exposed edge.
Stair Details
TimberTech AZEK Porch may be used for stair treads. TimberTech AZEK Deck 1″ x 5 1/2″ may also be used. TimberTech AZEK Deck rim joist cover or AZEK Trim can be used to trim out the risers.
- To meet AC174 requirement, install stair stringers at a maximum of 10″ on center.
- Some codes may require specific framing or structural requirements. Check with your local code authorities pertaining to specific stair requirements.
Why is it you cannot install Aztec t&g on top of floating deck sleepers. Like a rubber deck roof for instance.
We are not the manufacturer but this is what TimberTech has specified in their installation instructions for their T&G product. You can have a sleeper system with a minimum 1 1/2″ height clearance to allow for drainage and air flow but the sleeper system must be fastened to the rooftop substructure. Also most rooftops don’t have a rooftop over them so the catch here is their T&G product would not be recommended since it won’t allow for proper drainage. If your rooftop is open to rain it would be recommended to use their standard deck boards with a minimum 1/8″ gap spacing in between the boards to allow from drainage.